早上和女朋友交欢之后,在地铁里看到自己服务器挂了,一开始看是502以为是DDoS或者是腾讯云又关我服务。到了生导课现场才知道又是人肉挖矿。背后运行的是一个sha解密文件。不过是有壳的。
ssh密码被换了,但sshd没关,不知道攻击者的脚本是怎么想的。我上次加固redis和docker以后是不太会从那个方式攻入的。所以我判断是ssh的爆破。
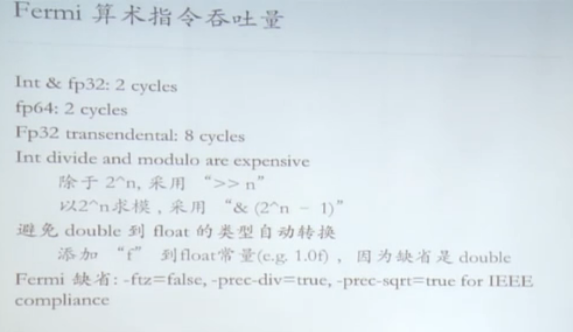
看了历史占用 CPU100% 这次比上次多了个储存也被占满了,用 find / -type f -size +10G 以为是/proc/kcore 可hexdump 一下却发现是纸老虎。实际不占用空间,只是个内存 的映射物,linux提供了几个args的参数。如果复用的话可能会达到128T。
这次因为ssh密码换了,而且有个后台自动修改替换,走我的华为云的自动开机重置密码无济于事。这次立功的bt-panel。 我直接把我的私钥换掉root/.ssh/authorized_keys。
ssh上去之后,crontab -e删了,删完自动又有。不过发掘是 /root/.tmp00/bash 在作恶,ps -ef | grep .tmp00 | grep -v grep | awk '{print $2}' | xargs kill -9 (注意不能删bash,会奔溃,估计脚本制作着就是这么想的)
reference: http://www.dashen.tech/2019/05/11/%E4%B8%80%E7%A7%8D%E8%AF%A1%E5%BC%82%E7%9A%84Linux%E7%A3%81%E7%9B%98%E7%A9%BA%E9%97%B4%E8%A2%AB%E5%8D%A0%E6%BB%A1%E9%97%AE%E9%A2%98/
/proc/kcore文件提供了整个机器的内存映像,和vmcore不同的是,它提供了一个运行时的内存映像,为此和vmcore一样,内核提供了一个类似的但是稍显简单的kcore_list结构体,我们比较一下它们:
struct kcore_list {
struct kcore_list *next;
unsigned long addr;
size_t size;
};
struct vmcore {
struct list_head list;
unsigned long long paddr;
unsigned long long size;
loff_t offset;
};
可 以看到vmcore比较复杂,事实上也正是如此,因此它的操作比较复杂,而且使用环境也是很复杂的,涉及到kexec和kdump机制,也许就是这个原因 它使用了内核中最普遍的list_head结构,但是对于kcore,它的结构十分简单,目的就是为了遍历整个内存,也不需要查找,删除等操作,因此它用 了自己的next字段来组成链表,如此一来可以节省一个指针的空间。
在系统初始化的时候,mem_init函数中将整个物理内存和vmalloc的动态内存都加入了kcore_list中,这样的话,这个链表中就最起码有 了两个元素,一个是物理内存,另一个是vmalloc动态内存。注意这里所说的物理内存就是一一映射的内存,其实也可以不是,你完全可以自己实现一个映射 方法代替这里的一一映射,linux内核默认的什么highmem,vmalloc_start等等还有一一映射抑或高端映射等等机制都只是一个更底层的 机制一些策略,这个更底层的机制就是linux内核的内存映射,因此在这个机制提出的约束上你可以实现很多种策略,区分物理一一映射和高端映射只是其中之 一罢了:
void __init mem_init(void)
{
…
kclist_add(&kcore_mem, __va(0), max_low_pfn << PAGE_SHIFT);
kclist_add(&kcore_vmalloc, (void *)VMALLOC_START, VMALLOC_END-VMALLOC_START);
…
}
void kclist_add(struct kcore_list *new, void *addr, size_t size)
{
new->addr = (unsigned long)addr;
new->size = size;
write_lock(&kclist_lock);
new->next = kclist;
kclist = new;
write_unlock(&kclist_lock);
}
得到kcore文件的大小,其实这个文件并不是真的占据那么大的空间,而是内核提供的“抽象”实体的意义上的大小就是那么大,这里就是整个内存映像:
static size_t get_kcore_size(int *nphdr, size_t *elf_buflen)
{
size_t try, size;
struct kcore_list *m;
*nphdr = 1;
size = 0;
for (m=kclist; m; m=m->next) { //找到最大的地址值加上长度后就是最后的结果,依据就是linux内核空间的映射方式
try = kc_vaddr_to_offset((size_t)m->addr + m->size);
if (try > size)
size = try;
*nphdr = *nphdr + 1;
}
*elf_buflen = sizeof(struct elfhdr) +
…//elf_buflen是额外的一个头部的长度
*elf_buflen = PAGE_ALIGN(*elf_buflen);
return size + *elf_buflen; //总的长度就是实际内存大小长度加上额外的头部的长度
}
procfs 是一个文件系统,是文件系统的话就要有一个file_operations结构体来实现这个文件系统的操作,可是在procfs文件系统中,每一个文件可 以有不同的操作回调函数,也就是说,procfs首先是一个文件系统,在它是文件系统的意义的基础之上,它又是另一种机制,它提供了一个内核导出信息的口 子,就是说,procfs作为文件系统的意义仅仅在于信息的导出,它里面的文件从来都不是真实的文件,但是确实有文件的接口,比如你在ls -l命令发出给/proc/kcore文件时,它给出了文件的“大小”,实际上并不会占据那么大的空间而仅仅是一个数字,该数字是从上面的 get_kcore_size中得到的。在procfs文件系统中,每个文件都是一个proc_dir_entry,这才是它真正要表达的,套在标准文件 系统之上的那一层东西,该结构中的proc_fops就是该结构代表文件的file_operations结构体,如果这么理解的话,procfs文件系 统下的每一个文件都可以有自己的file_operations了而不必统一用整个procfs的一个file_operations,就像 ext2/ext3等传统的真实文件系统一样,从OO的角度来看,procfs继承了vfs文件系统,在文件系统的基础上实现了自己的特性(其实每一个具 体文件系统都有自己的特性,都继承并实现了vfs这个抽象类,不过本文就是说procfs的一个文件的,因此它显得比较特殊)。就好像前几篇文章中所描述 的seqfile一样,它就是专门为procfs提供一个串行化读取的接口函数机制而不是一个独立的机制,它可以被用在procfs的 file_operations中,当然也可以被用到别处。我们接下来看看read_kcore,它就是/proc/kcore这个proc文件的 proc_fops即file_operations的read回调函数:
static ssize_t read_kcore(struct file *file, char __user *buffer, size_t buflen, loff_t *fpos)
{
ssize_t acc = 0;
size_t size, tsz;
size_t elf_buflen;
int nphdr;
unsigned long start;
read_lock(&kclist_lock);
proc_root_kcore->size = size = get_kcore_size(&nphdr, ⪙f_buflen);
if (buflen == 0 || *fpos >= size) {
read_unlock(&kclist_lock);
return 0;
}
if (buflen > size - *fpos)
buflen = size - *fpos;
…//为读出的内容添加elf头部。
start = kc_offset_to_vaddr(*fpos - elf_buflen); //物理地址到虚拟地址的转换,其实对于一一映射就是加上一个PAGE_OFFSET偏移量,这也是默认情况,当然也可以提供别的转换方式。
if ((tsz = (PAGE_SIZE - (start & ~PAGE_MASK))) > buflen)
tsz = buflen;
while (buflen) {
struct kcore_list *m;
read_lock(&kclist_lock);
for (m=kclist; m; m=m->next) { //寻找这个地址所属的kcore_list
if (start >= m->addr && start < (m->addr+m->size))
break;
}
read_unlock(&kclist_lock);
…//没有找到的错误处理
} else if ((start >= VMALLOC_START) && (start < VMALLOC_END)) { //在这种情况下,说明用户要读取的是vmalloc空间的内存映像,那么很简单,就是遍历vmalloc空间的vm_struct结构体们,然后将之上 的数据取出来。
char * elf_buf;
struct vm_struct *m;
unsigned long curstart = start;
unsigned long cursize = tsz;
elf_buf = kmalloc(tsz, GFP_KERNEL);
if (!elf_buf)
return -ENOMEM;
memset(elf_buf, 0, tsz);
read_lock(&vmlist_lock);
for (m=vmlist; m && cursize; m=m->next) {
unsigned long vmstart;
unsigned long vmsize;
unsigned long msize = m->size - PAGE_SIZE;
…//限制判断
vmstart = (curstart < (unsigned long)m->addr ?
(unsigned long)m->addr : curstart);
if (((unsigned long)m->addr + msize) > (curstart + cursize))
vmsize = curstart + cursize - vmstart;
else
vmsize = (unsigned long)m->addr + msize - vmstart;
…//更新数据
memcpy(elf_buf + (vmstart - start), (char *)vmstart, vmsize);
}
read_unlock(&vmlist_lock);
if (copy_to_user(buffer, elf_buf, tsz)) //向用户拷贝内存数据
…
kfree(elf_buf);
} else { //最后一种情况就是读取物理内存了,其实也不一定,要看体系结构了,在x86上而且内核编译flatmem的情形下,这就是读取物理内存。
if (kern_addr_valid(start)) {
unsigned long n;
n = copy_to_user(buffer, (char *)start, tsz);
…//错误处理
}
…//更新偏移以及指针数据
}
return acc;
}
read 函数完毕之后,整个内存就被读出来了,存到一个地方保存那么这就是当时的内存运行快照,这里不得不说的是,这个信息可以用于调试,但是对于module的 调试就不是那么简单了,虽然kcore文件可以dump出整个内存,但是对于调试来说,这些信息是不够的,我们通过这些信息只能得到它当前是什么,而不能 得到它应该是什么,要想得到它应该是什么就必须有了原始的副本,幸运的是,linux的物理内存一一映射使得这个问题简化,linux内核vmlinuz 或者用于调试的vmlinux本身就是一个elf文件,-g选项编译的内核还有很多调试信息,elf连接脚本上写了符号加载的位置,以及elf的code 节,data节等等elf的要素,一一映射使得内核连接脚本的编写很简单,而且使得该脚本连接得到的内核载入内核时很容易的映射到了很简单的虚拟内存位 置,就是一个地址加上偏移。但是简单也就到此为止了,试想一下可加载的内核模块(LKM),在sys_init_module系统调用实现函数里发现模块 都是被映射到了vmalloc动态内存空间,包括它的代码,数据等等,如此一来,module的elf文件中写的节的载入地址在linux内核映射策略面 前成了一堆废物,即使你用module的原始副本来调试从/proc/kcore导出的映像也会发现很多的调试信息对不上,因此如何调试模块也就成了一个 大问题,linux的内核开发者也在着手解决这个问题…