❯ curlie https://alx.sh | sudo sh (base)
HTTP/2 200
server: nginx/1.21.1
date: Sat, 19 Mar 2022 15:19:56 GMT
content-type: text/plain; charset=utf-8
content-length: 967
cache-control: max-age=300
content-security-policy: default-src 'none'; style-src 'unsafe-inline'; sandbox
etag: "af389cf3253fe3f924350c99c293434d1c78883b3c51676bf954211c7bb0872b"
strict-transport-security: max-age=31536000
x-content-type-options: nosniff
x-frame-options: deny
x-xss-protection: 1; mode=block
x-github-request-id: 821E:6DAB:83C117:8E8F7F:623518DF
accept-ranges: bytes
via: 1.1 varnish
x-served-by: cache-fra19151-FRA
x-cache: HIT
x-cache-hits: 1
x-timer: S1647703197.985480,VS0,VE1
vary: Authorization,Accept-Encoding,Origin
access-control-allow-origin: *
x-fastly-request-id: 7ac18bfda3e671762cc598d7521b9663e583d871
expires: Sat, 19 Mar 2022 15:24:56 GMT
source-age: 195
strict-transport-security: max-age=31536000;
Bootstrapping installer:
Checking version...
Version: v0.3.5
Downloading...
Extracting...
Initializing...
Welcome to the Asahi Linux installer!
This installer is in an alpha state, and may not work for everyone.
It is intended for developers and early adopters who are comfortable
debugging issues or providing detailed bug reports.
Please make sure you are familiar with our documentation at:
https://alx.sh/w
Press enter to continue.
By default, this installer will hide certain advanced options that
are only useful for developers. You can enable expert mode to show them.
» Enable expert mode? (y/N): y
Collecting system information...
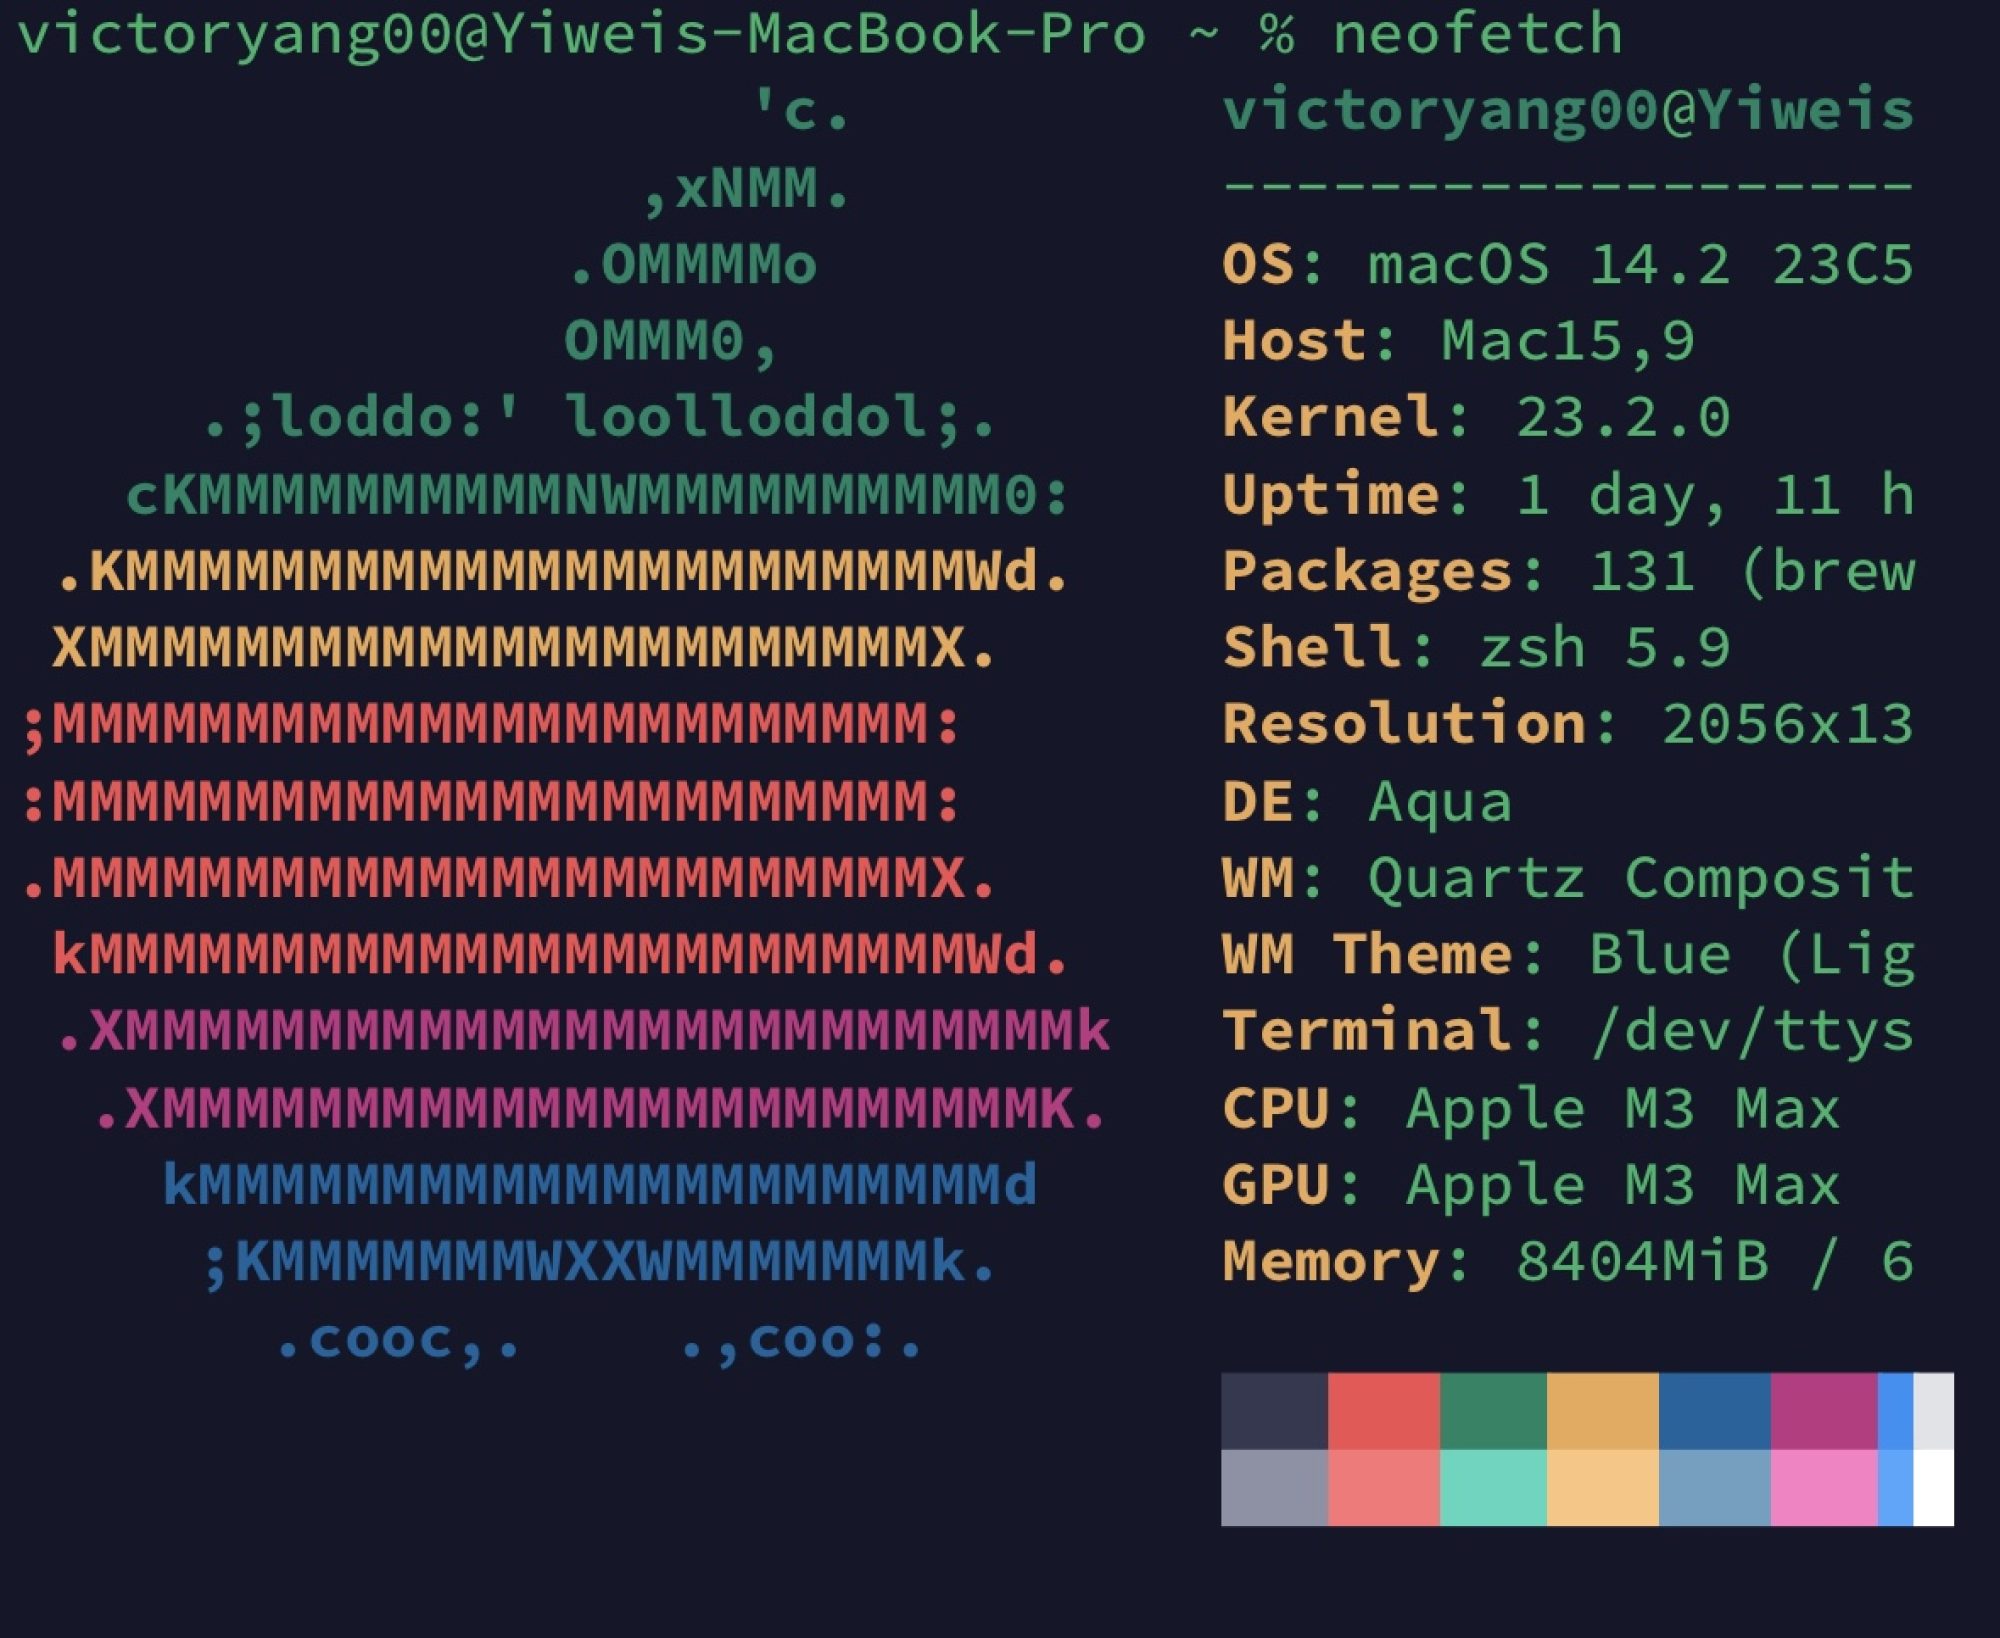
Product name: MacBook Pro (16-inch, 2021)
SoC: Apple M1 Max
Device class: j316cap
Product type: MacBookPro18,2
Board ID: 0xa
Chip ID: 0x6001
System firmware: iBoot-7459.101.2
Boot UUID: 57F7E9CF-77CE-4D0F-83A4-15967BA49F69
Boot VGID: 57F7E9CF-77CE-4D0F-83A4-15967BA49F69
Default boot VGID: 57F7E9CF-77CE-4D0F-83A4-15967BA49F69
Boot mode: macOS
OS version: 12.3 (21E230)
System rOS version: 12.3 (21E230)
No Fallback rOS
Login user: yiweiyang
Collecting partition information...
System disk: disk0
Collecting OS information...
Partitions in system disk (disk0):
1: APFS [Macintosh HD] (850.00 GB, 6 volumes)
OS: [B*] [Macintosh HD] macOS v12.3 [disk3s1, 57F7E9CF-77CE-4D0F-83A4-15967BA49F69]
2: (free space: 144.66 GB)
3: APFS (System Recovery) (5.37 GB, 2 volumes)
OS: [ ] recoveryOS v12.3 [Primary recoveryOS]
[B ] = Booted OS, [R ] = Booted recovery, [? ] = Unknown
[ *] = Default boot volume
Using OS 'Macintosh HD' (disk3s1) for machine authentication.
Choose what to do:
f: Install an OS into free space
r: Resize an existing partition to make space for a new OS
q: Quit without doing anything
» Action (f): f
Choose an OS to install:
1: Asahi Linux Desktop
2: Asahi Linux Minimal (Arch Linux ARM)
3: UEFI environment only (m1n1 + U-Boot + ESP)
4: Tethered boot (m1n1, for development)
» OS: 1
Downloading OS package info...
.
Minimum required space for this OS: 15.00 GB
Available free space: 144.66 GB
How much space should be allocated to the new OS?
You can enter a size such as '1GB', a fraction such as '50%',
the word 'min' for the smallest allowable size, or
the word 'max' to use all available space.
» New OS size (max): max
The new OS will be allocated 144.66 GB of space,
leaving 167.94 KB of free space.
Enter a name for your OS
» OS name (Asahi Linux):
Choose the macOS version to use for boot firmware:
(If unsure, just press enter)
1: 12.3
» Version (1): 1
Using macOS 12.3 for OS firmware
Downloading macOS OS package info...
.
Creating new stub macOS named Asahi Linux
Installing stub macOS into disk0s5 (Asahi Linux)
Preparing target volumes...
Checking volumes...
Beginning stub OS install...
++
Setting up System volume...
Setting up Data volume...
Setting up Preboot volume...
++++++++++
Setting up Recovery volume...
+++++++++++++++++++++++++++++++++++++++++++++++++++++++++
Wrapping up...
Stub OS installation complete.
Adding partition EFI (500.17 MB)...
Formatting as FAT...
Adding partition Root (144.16 GB)...
Collecting firmware...
Installing OS...
Copying from esp into disk0s4 partition...
+
Copying firmware into disk0s4 partition...
Extracting root.img into disk0s7 partition...
++++++++++++++++++++++++++++++++++++++++++++++++++++++++++++++++++++++++++++++++++++++++++++++++++++++++++++++++++++++++++++++++++++++++++++++++++++++++++++++++++
+++++++++++++++++++++++++++++++++++++++++++++++++++++++++++++++++++++++++++++++++++Error downloading data (IncompleteRead(10240000 bytes read, 1294336 more expected)), retrying... (1/5)
+Error downloading data (IncompleteRead(1130496 bytes read, 10403840 more expected)), retrying... (2/5)
+++++++++++++++++++++++++++++++++++++Error downloading data (IncompleteRead(5979282 bytes read, 5555054 more expected)), retrying... (1/5)
+++++++
Preparing to finish installation...
Collecting installer data...
To continue the installation, you will need to enter your macOS
admin credentials.
Password for yiweiyang:
Setting the new OS as the default boot volume...
Installation successful!
Install information:
APFS VGID: 052A3A5A-E253-4B46-AF6A-F9615F39844B
EFI PARTUUID: 487bfda1-77ae-4a4c-8462-3cba91f073a7
To be able to boot your new OS, you will need to complete one more step.
Please read the following instructions carefully. Failure to do so
will leave your new installation in an unbootable state.
Press enter to continue.
When the system shuts down, follow these steps:
1. Wait 15 seconds for the system to fully shut down.
2. Press and hold down the power button to power on the system.
* It is important that the system be fully powered off before this step,
and that you press and hold down the button once, not multiple times.
This is required to put the machine into the right mode.
3. Release it once 'Entering startup options' is displayed,
or you see a spinner.
4. Wait for the volume list to appear.
5. Choose 'Asahi Linux'.
6. You will briefly see a 'macOS Recovery' dialog.
* If you are asked to 'Select a volume to recover',
then choose your normal macOS volume and click Next.
You may need to authenticate yourself with your macOS credentials.
7. Once the 'Asahi Linux installer' screen appears, follow the prompts.
Press enter to shut down the system.

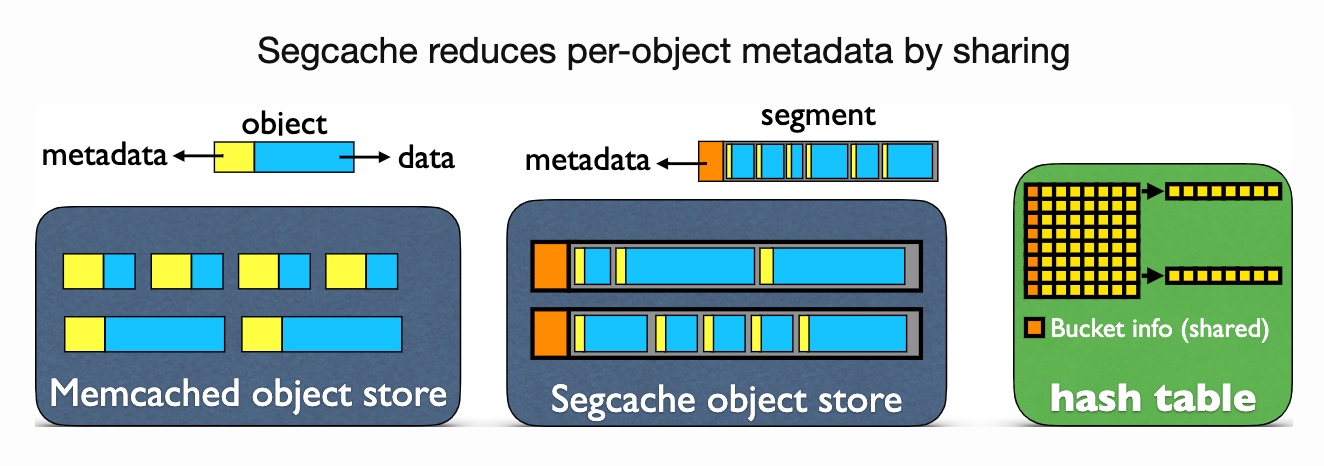


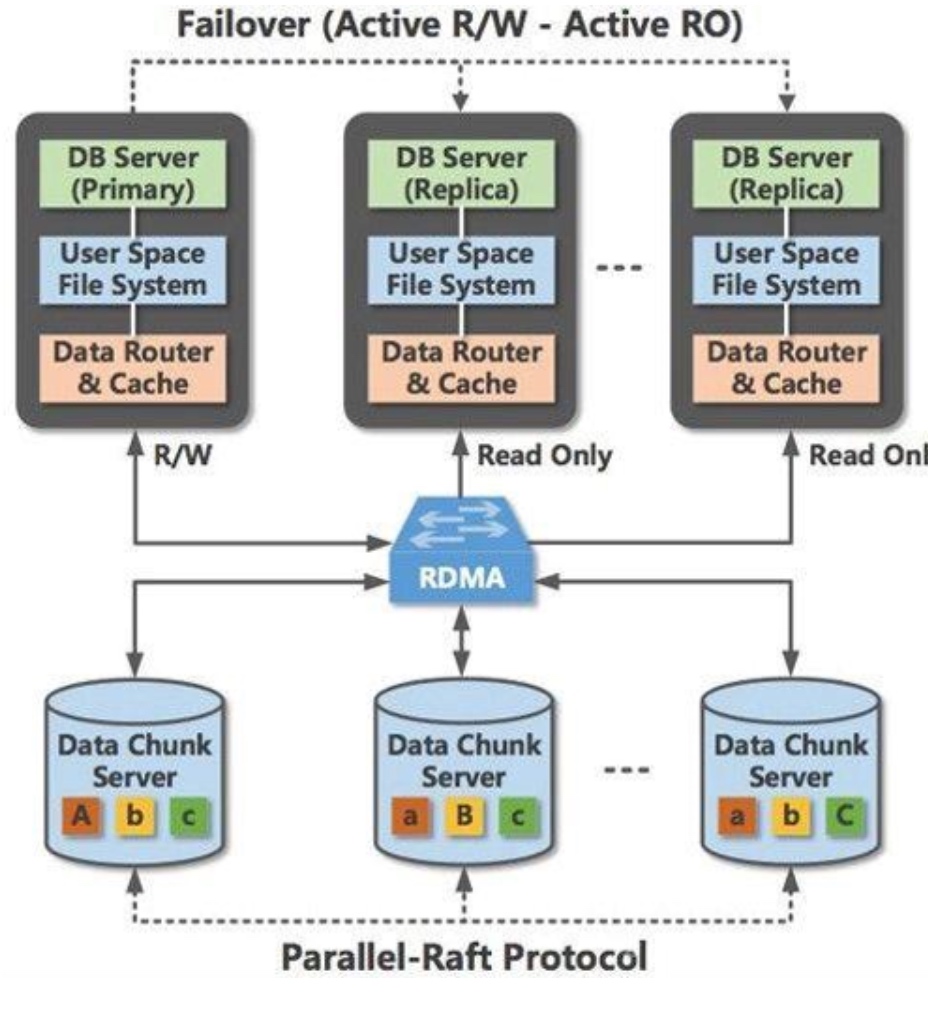
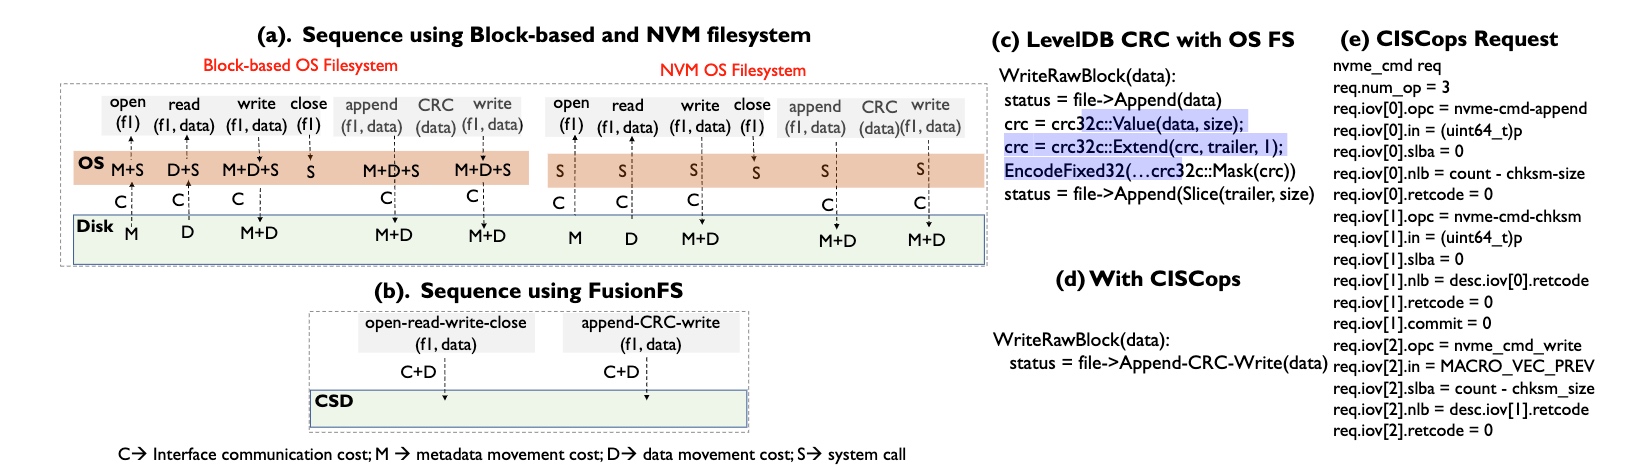 Basically, based on the predefined rules, the co-processor is able to fuse most of the data operations like LevelDB CRC, open read-write close.
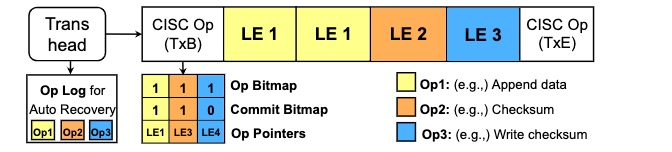
 I'm curious why not implement the SSD main controller? It's meaningless to write on NVM because programmers must do handmade I/O fusion on such devices.
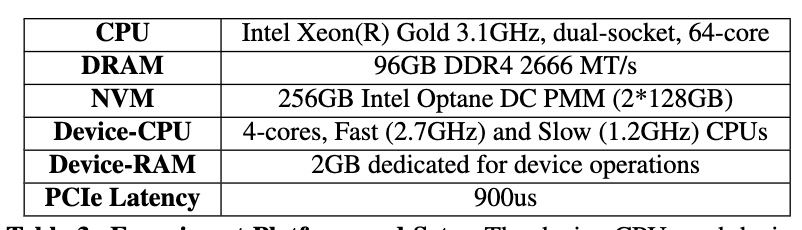
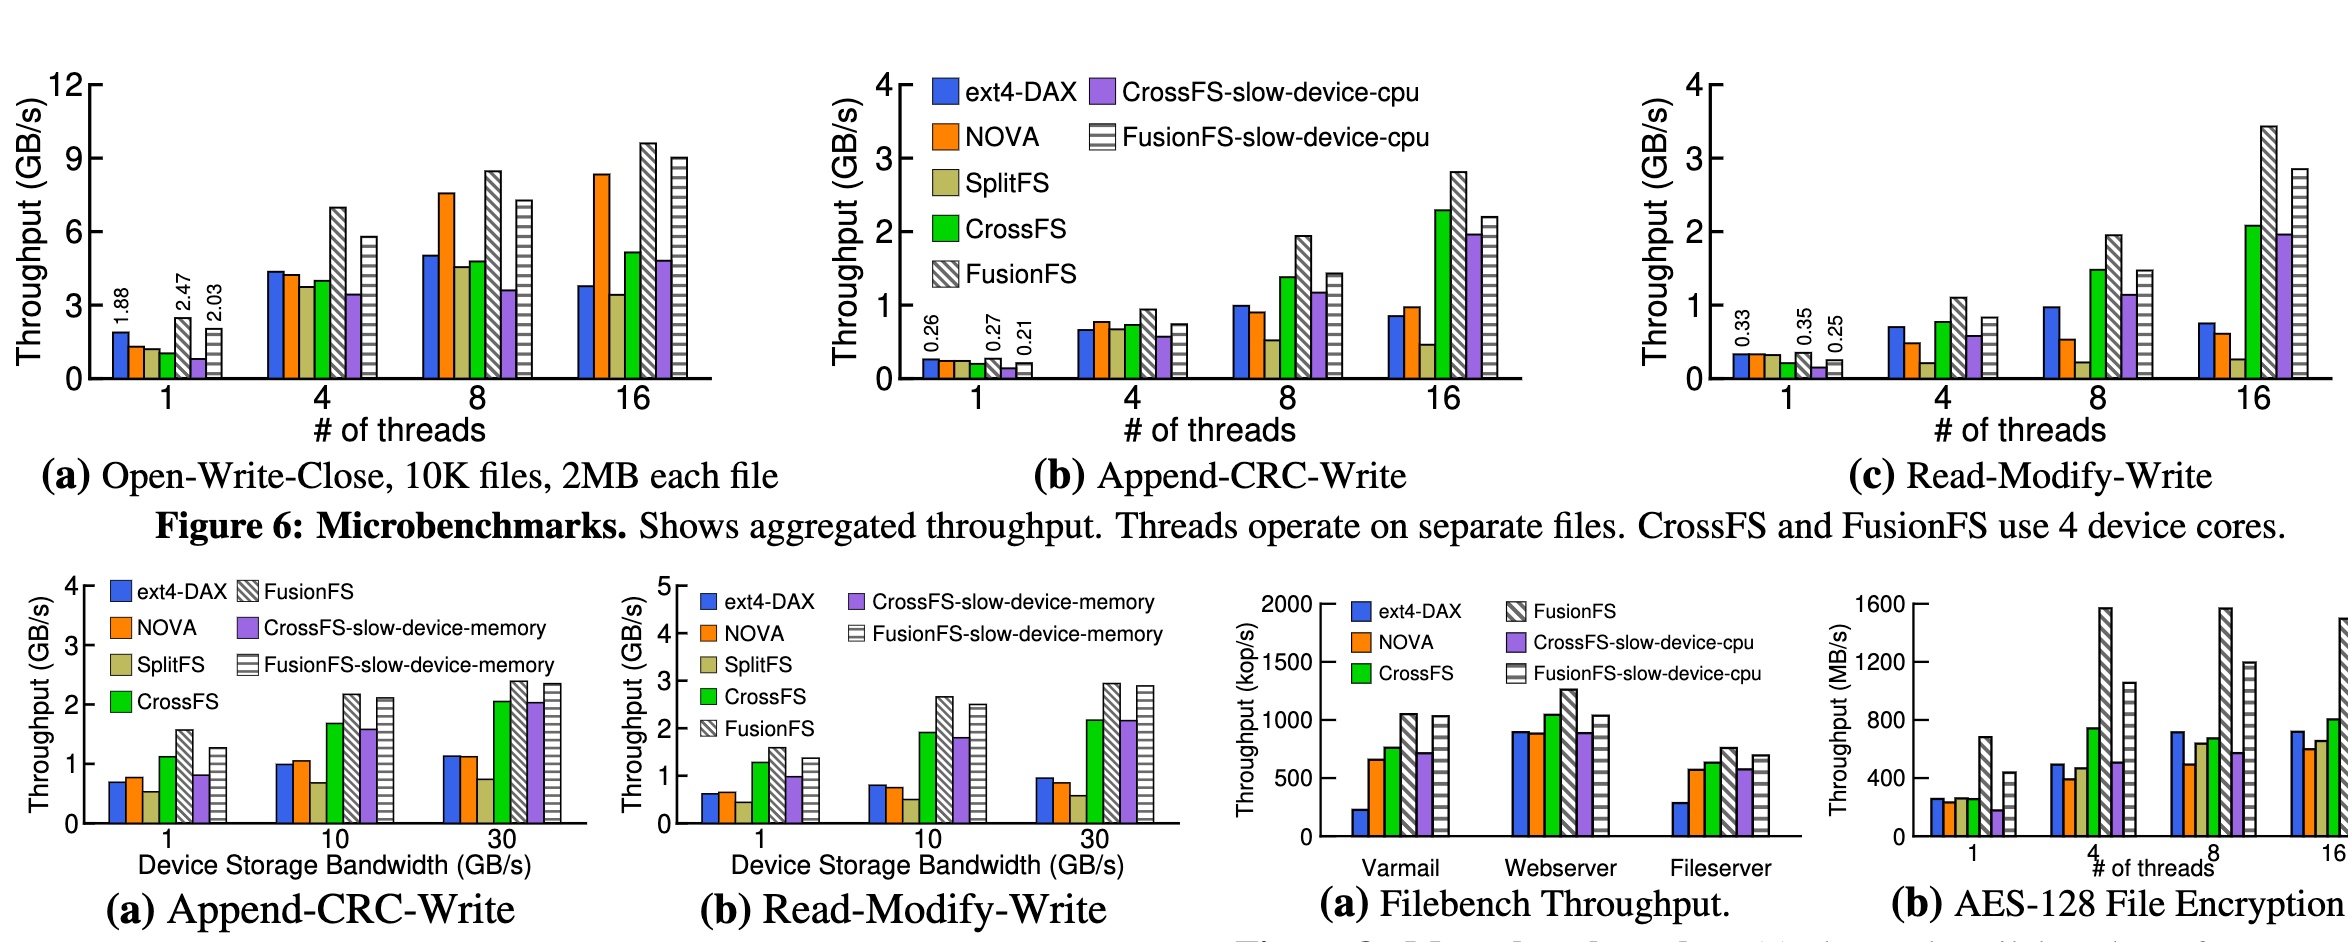 Performance is roughly the same with NOVA when with slow device CPU. I don't know if IO thread affinity and other kernel optimization are applied, the additional hardware has real benefits. However, the recovery speed is really quick because of MicroTx.